


")

Are you ready to feel like a badass when you lift heavy things up and over your head?
If so, then you’ve come to the right place!
This is your one-stop shop for learning everything you need to know about the overhead press, whether you’re…
- Looking to develop your upper body and shoulder strength
- Hoping to improve your shoulder mobility
- Recovering from a lower-body injury and looking for a way to still get some gains in the gym
- Searching for an exercise that will pay dividends in your other training (or your Muay Thai sessions!)
… or simply curious about how to safely add the overhead press to your training program.
In this article, you’ll learn the benefits of the overhead press, how to safely practice overhead pressing (even if you’re using different types of equipment), and how to prevent common technique errors.
What Is an Overhead Press, Anyways?
When you do an overhead press, you’re moving a weight from chest level up and over your head by straightening your arm(s). Or in other words, pressing a weight toward the ceiling and away from your body. An overhead press can be done from kneeling, supine, seated, and standing positions.
Also called the military press, the strict press, or even simply the press, the overhead press is a compound upper body movement. (A compound movement works several muscles or muscle groups at once.) While it may seem like it’s only an arm and shoulder workout — and it does work these areas very well, especially when it comes to your triceps and lats — it also targets the chest, back, and core muscles. And if you’re pressing from a standing position, the additional engagement of your glutes, quads, and feet means you’re getting a full-body workout.
Benefits of Overhead Pressing
Beyond its ability to work a ton of muscle groups in one go, the overhead press comes with a host of other benefits, including:
- Enhancing your upper body strength and power, which will carry over to other lifts and overall strength training capabilities.
- Improving performance in multiple sports (like baseball, Muay Thai, and Brazilian jiu-jitsu).
- Strengthening your ability to push up from the floor to get into a standing position, hoist that Pyrex dish up to the top shelf of your cupboard, or power your luggage up into an overhead bin on an airplane.
- Helping develop powerful shoulders that pop in tank tops.
Pressing is also a great way to assess your ability to create full-body tension. If you’re feeling unstable or you’re struggling with form, you can do a body scan from the ground up to evaluate where you may be losing that tension, and then target some areas for improvement.
Plus, there’s just a special kind of joy and power that comes when you start lifting heavy things overhead!
Now that you know why the overhead press is so important in your training, I’m sure you’re super excited to learn how to do it properly. But first, I want to quickly touch on a few things you need to be able to do before you can press safely.
Before You Press: Mobility Check
Before you start pressing weight overhead, you need to have enough shoulder mobility to ensure you can move through the full range of motion safely. Here are three questions to consider prior to pressing.
Can you move through the full range of motion without pain?
This is the first thing to evaluate if you’re interested in working on your overhead press. Here are the two movements to try:
- Raise your arms up from your sides (lateral raise) until they’re straight overhead.
- Raise your arms toward the front (full shoulder flexion) until they’re straight overhead (without bending your elbows).
If you can’t raise your arms 180 degrees from your sides or front without pain or bending your elbows, then working on your mobility first before moving onto overhead pressing is best. A few exercises that may be helpful here include:
- Shoulder circles
- Arm raises to side
- Arm swings
- Kettlebell arm bar
- Kettlebell shoulder twist
- Kettlebell halo
Do you struggle with shoulder impingement?
Shoulder impingement can cause pain as well as a decreased range of motion in the shoulder joint. While having impingement doesn’t necessarily mean you can’t practice your overhead press, if you’re struggling with pain or limited mobility, I encourage you to have your shoulder mobility assessed by a mobility coach, physiotherapist, or qualified trainer before adding the press to your strength training program. Being cleared for the movement by an expert — and then consciously working on your shoulder mobility before you practice your stability and control with pressing movements — may help prevent future issues or injuries.
(Note: If you’re recovering from a lower-body injury, the press can become your new best friend. It’s a great movement to practice to develop upper body strength, and because you can do it in a variety of positions [e.g., seated press], you can work around many injuries. However, be cautious not to overdo it. If you’re not in the proper position, especially if you’re compounding improper position with a high volume of reps or a heavier weight, you can cause shoulder impingement. No one wants that! Listen to your body, and make sure your mobility is there first — even if it’s tempting to dive in right away.)
Are your pec muscles tight?
Pectoralis muscle flexibility is key to safely performing the overhead press. If your chest is too tight, your range of motion may be restricted, which will make it challenging to complete the movement with proper form. If you lie on your back and extend your hands out to your sides, palms up, and feel a lot of stretching in your chest, you probably have tight pecs.
Work on your flexibility by adding some chest stretches into your training routine as movement prep. The kettlebell arm bar or some band mobility exercises would be great.
Alright, now that we’ve covered the mobility piece, let’s look at how to do an overhead press!
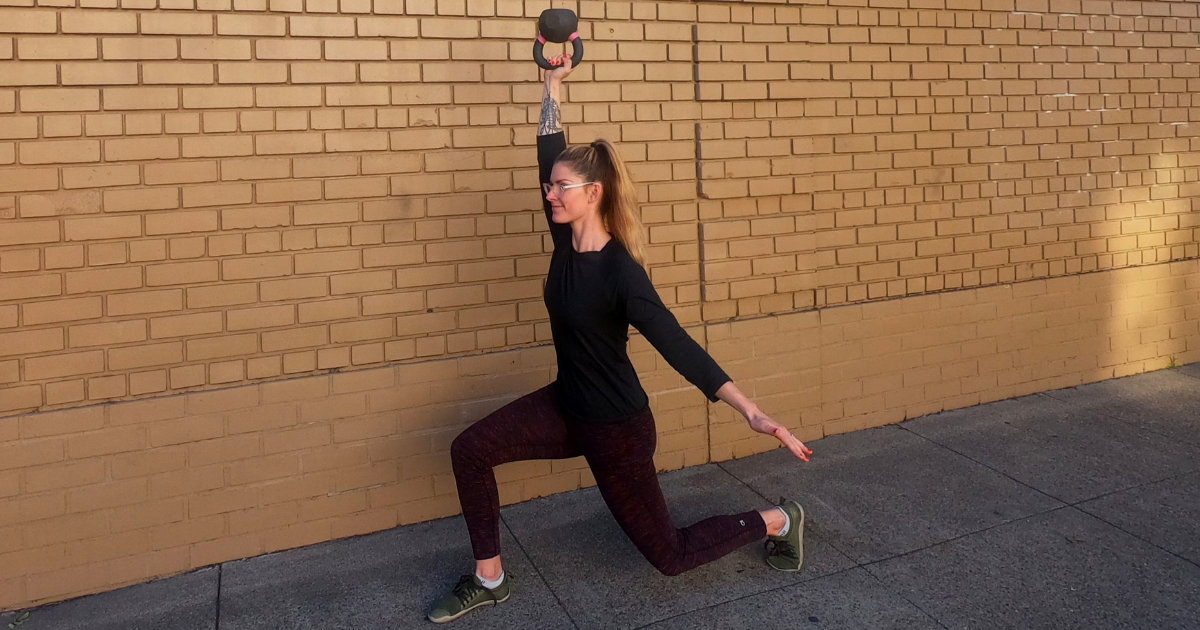
How to Do a One-Arm Overhead Press with a Kettlebell
As I’m a kettlebell instructor, kettlebells are (as you may have guessed!) my jam. They’re great for both beginners and more advanced lifters because there are so many options for size, grip, and weight. Plus, the offset center of mass of a bell makes it a beautifully challenging tool to use, regardless of experience level. That’s why we’re going to start by looking at how exactly to do a kettlebell overhead press! (I’ll cover how to adapt the pressing movement based on the type of weight you want to use next.)
You’ll need to know how to perform a kettlebell clean before you can do a kettlebell overhead press.
How to Do a One-Arm Kettlebell Overhead Press
- Start in a standing position with your feet shoulder-width apart (or slightly narrower). The kettlebell should be sitting about a foot in front of you.
- Clean the bell to the rack position. (If you don’t know how to clean yet, you can “cheat clean” by assisting the kettlebell to the rack with your free hand.) Your wrist should be completely straight, forming a straight line with your forearm.
- Imagine spreading tension through your whole body. Engage your core, tighten your quads, and squeeze your glutes. Your gaze should be straight ahead, with your spine neutral.
- Roll your shoulders back and down.
- Take a breath in, and then on your exhale, press upward from the rack position.
- As you press, pull your shoulder blades back and together slightly as you squeeze your glutes.
- Keep your wrist straight (neutral) and knuckles pointed up like you’re going to punch through the ceiling. Your forearm should stay perpendicular to the floor (vertical) during the entire movement.
- Extend your arm until you find your overhead lockout position (i.e., the bell is overhead with a straight arm and stable, packed shoulder). Your wrist should be stacked over your elbow, which is stacked over your shoulder. (If you’re hypermobile, be careful not to hyperextend your elbow here!)
- Reverse the movement by bringing the bell down through the same path it took on the way up. Pull into your back and lat muscles to control the movement downward — imagine that you’re rowing the weight back down.
- Repeat for reps, then switch to the opposite arm!
Brand new to kettlebell training? Learn exactly how to use one, plus five great kettlebell exercises for beginners.
Overhead Press Variations: Dumbbells and Barbells
Let’s look now at how to adapt for different types of equipment and set-ups. Keep in mind that the basic steps will stay the same regardless of the overhead press variation you choose: Your core is engaged, you’re spreading tension throughout your body, and then you’re pressing a weight from shoulder height up and over head until your arm is extended.
How to Do a One-Arm Seated Dumbbell Overhead Press
Like the kettlebell overhead press, the dumbbell overhead press is great for beginners and advanced lifters alike because you have the option to vary the load and change up the technique. The cues here assume a one-arm seated overhead press with dumbbells.
- Set up so your pelvis is firmly on the seat or bench, and your feet are placed firmly on the floor.
- If you’re using back support, make sure you have full contact with the bench or chair back. (Be careful not to lean back over the edge of the support.)
- Keep a neutral spine.
- Start by holding the dumbbell just outside your shoulder. Your arm should be bent with your palm facing inward.
- Press the dumbbell toward the ceiling, extending your arm straight up.
- Stop just shy of locking out your elbow.
- Lower the dumbbell down through the same path, stopping at shoulder level.
- Repeat for reps, and then switch sides.
You also have the option to do a seated dumbbell overhead press bilaterally, with two dumbbells, or while in a standing position. Mix things up as needed based on your skill level, strength, equipment availability, and interest.
Bonus: If you’re brand new to lifting, or you’re at home and don’t have access to equipment, you can practice this movement with a soup can or a water bottle! It’s a fantastic way to move through the full range of motion and get the hang of the movement pattern before progressing to heavier or more challenging weights. Again, this can be done in a seated or standing position.
How to Do a Barbell Overhead Press
The barbell overhead press is a more advanced variation you can progress to after working on kettlebell and dumbbell variations. You can perform this movement from a seated position on a bench (use the seating cues from the overhead press instructions above), or in a standing position. The cues here will walk you through a standing barbell press.
- Find your starting position, with feet hip-width apart and the barbell in a rack position (resting on your front deltoids).
- Your palms should be facing the ceiling, with the bar resting softly on them. Your forearms should form a perpendicular line with the bar, with your elbows slightly forward. While your exact hand position on the bar will be dictated by your unique anatomy, your hands should be just outside your shoulders (not too wide). Imagine making a W with your body.
- Engage your core and spread tension through your body.
- Press the bar overhead, squeezing your glutes and tightening your quads. Stop just prior to locking out your elbows.
- Lower the bar slowly, reversing your initial bar path, until just before it touches your chest. (Note: You will lower the barbell slightly lower than you would dumbbells.)
- Repeat for reps.
Form Check: Common Overhead Press Mistakes
There are a few mistakes to watch out for, no matter which overhead press variation you’re practicing. Here’s a quick rundown of things to keep an eye out for:
- Floppy wrists. Check your wrist position to make sure it stays in neutral alignment, especially when working with dumbbells and kettlebells.
- Relaxed core. Keeping your core muscles engaged, all the way from your starting position through to the end of your reps, is key. You may also want to add a little extra engagement during the lift.
- Forgotten glutes. Squeeze your glutes as you press to help generate full-body tension, stay stabilized, and maintain your neutral spine.
- Breath holding. Breathe in through the nose and out through the mouth with pursed lips, exhaling on exertion portion of the movement (i.e., the press). You may want to start your workout with some Connection Breaths, which you can then continue with during your lifting.
- Arched back. Avoid arching your lower back and flaring your ribs up and out as you press. Roll your shoulders back and feel your shoulder blades connecting with your ribcage in the back. Keep your spine neutral and rib cage down, with eyes directed in front of you. (And squeeze those glutes!)
- Torso tipping. Don’t fall into the easy trap of leaning one way or the other to try and boost the weight up. Keep your shoulders level. Watching your form in the mirror can help with this.
- Pressing out not up. Lift in a straight line toward the ceiling, stacking wrist over elbow over shoulder; avoid pushing the weight out in front of you at the same time.
Interested in adding more variety to your functional strength training program? Check out these 4 kettlebell deadlift variations.
Incorporating the Overhead Press into Your Training
If you’ve checked your mobility and are ready to start adding the overhead press to your training, you have a couple of options depending on your goals and experience.
- If you’re brand new to weightlifting, talk to your coach about how to incorporate overhead pressing into your existing training program. If you don’t have a coach, start with a light weight (5–8 pounds) and try for 2–3 sets of 10–12 reps. If you can’t perform 10–12 reps with your chosen weight while maintaining good form, drop down to a lighter version. If it feels too easy, go up a few pounds.
- If you’re an intermediate to advanced lifter and already working on bench presses or Olympic lifts, overhead pressing variations may be an excellent warm-up for heavier lifting days. You could also incorporate them on alternate training days to give yourself some variation from the bigger lifts.
As you’ve learned, the overhead press is a critical tool to add to your training arsenal — and now you know how to do it with three different types of equipment. Great job! It won’t take long to see improvements in your strength, stability, and mobility.
And when you’re ready for a little more variation… try playing around more with kettlebells!
As I already mentioned, the offset center of mass makes working through different planes of movement a fun challenge. The bottoms-up press, double overhead press, and straddle Z press are unique options I highly recommend trying out when you’re ready for your next performance goal.
Now go have fun lifting those heavy things up and over your head!